Imaging guide
To allow computerized analysis of a gel, an image must first be acquired and stored in a suitable digital form, while preserving the information contained in the gel. This guide explains some terms commonly used in association with digital images and provides guidelines for the image acquisition process.
Image acquisition and the digital image
The principle of image acquisition is simple: light is emitted from a light source, transformed by the gel, and the resulting light is then measured by a detector and converted into a number – called the signal intensity or gray value. During digitization, the gel is resolved into a two-dimensional matrix of squares, or pixels. Each pixel in the generated image file is characterized by its row (X) and column (Y) coordinates, and its gray value.
Resolution
Resolution is the ability to distinguish visible detail in the image and is linked to the pixel size. A high resolution corresponds to a small pixel size (typically expressed in micron, i.e. a pixel width of 1 micrometer) or a high number of pixels per unit length (ppi/dpi, pixels/dots per inch).
Higher resolutions give better precision, although the increase in precision becomes marginal once a certain threshold resolution is reached. At the same time, when the resolution becomes too high, the image file becomes very large and image analysis requires more time and memory. When the image resolution is too low, individual spots cannot be distinguished.
For normal sized gels (ca. 20 x 20 cm), a resolution between 150 and 300 dpi (169 – 85 micron) is optimal. For minigels (ca. 7 x 7 cm), with smaller spots, a higher resolution (e.g. 600 dpi or 42 micron) is indicated. As a rule of thumb, the resulting images should be at least 1000 x 1000 pixels, and at most 2500 x 2500 pixels, with the smallest spots having a diameter of at least 5 to 10 pixels.
Bit depth
The bit depth or image depth describes the number of potential gray levels or colors available to the image. In the case of an 8 bit grayscale image, one pixel has 256 (28) possible gray levels. Using a higher bit depth, like 16 bit, yields a much higher number of gray values (216 = 65536 gray levels). Images scanned with a higher bit depth will allow greater precision in differentiating spot abundances and greater quantitative accuracy. This is the case even if you do not see the difference on the screen or in print.
We strongly recommend a bit depth of at least 12 bit (212 = 4096 gray levels) for gel analysis. 16 bit is preferred. It is not recommended or useful to increase the bit depth after the imaging process. Transforming an 8 bit image to a 16 bit image will result in an image with still 256 possible gray levels.
Note that color images are often 24 bit: 8 bits each of red, green and blue. The extra color information does not benefit subsequent image analysis, so make sure to use grayscale instead of color images.
Dynamic range
The dynamic range is the pixel intensity difference between the lightest and darkest pixels of an image. It is related to bit depth and indicates how much of the range of possible gray values is used in the image. If, for a 12 bit image (4096 possible gray levels), the image contains intensities between 0 and 1024, only 25% of the available range is in use. The higher the dynamic range, the more potential gray values can be used to differentiate spot abundances and the greater the quantitative accuracy.
To fully exploit the dynamic range, you must maximize the distance between the background and highest intensities in the image.
There are different things you can do to increase the dynamic range:
- Use superior imaging systems with a high dynamic range.
- In CCD (Charge-Coupled Device) camera systems, you can increase the exposure time.
- In laser based systems you can increase the voltage of the PMT (Photo Multiplier Tube) detector.
- Carefully specify the lowest and highest intensity values of interest, if your imaging device allows to do this. Signal intensities within this range will be evenly distributed between zero and the maximum for the bit depth. Do not acquire areas outside the gel area because they will needlessly “use” part of your dynamic range.
Saturation and background clipping
In principle, the full range of intensities present in the gel should be represented by the gray values produced by the imaging device. If the physical intensities on the gel are beyond the dynamic range displayed in the image, there will be pixels for which the intensity value is truncated to either the brightest or darkest values possible in the image.
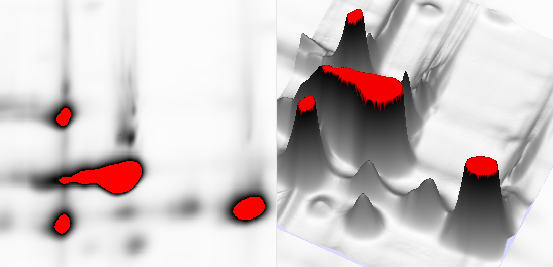
Saturation creates whole areas in an image where the pixel values are at the maximum value (e.g. 255 in an 8 bit gray-scale image). Any subtleties of information in that area are lost. In the Quality control step in Melanie, saturated pixels are shown in red. In 3D, this can be seen as peaks in the image that are cut-off. No reliable quantification can be carried out on such spots, because part of the peak is missing.
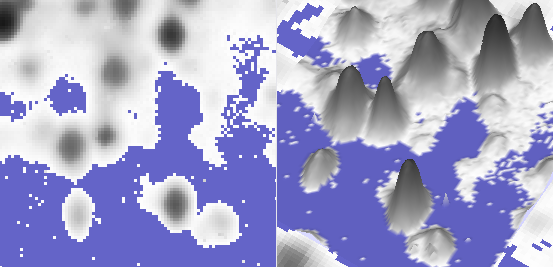
Similarly, background clipping creates whole areas in an image where the pixel values are at the minimum value (e.g. 0). Melanie displays such pixels in blue in the Quality control step. In 3D, this can be seen as a completely flat background, without the usual background noise. No reliable quantification can be carried out on spots in background-clipped areas, because the true background cannot be measured.
There are different things you can do to avoid saturation and background clipping:
- Use superior imaging systems with a high dynamic range.
- In CCD camera systems, you can adjust the exposure time.
- In laser based systems you can adjust the voltage of the PMT.
- For visible stains, use transmission mode instead of reflection mode. Reflection mode increases the likelihood of complete absorption and saturation effects because the light travels through the gel twice.
Intensity encoding and calibration
Some imaging devices can measure more gray levels than can be stored in the available image formats (typically images with 100 000 gray levels are possible). These instruments encode the gray values using a nonlinear calibration curve (generally encoding low intensity values with higher accuracy than the high intensity values), to conserve as much information as possible in the saved files. Melanie uses the calibration curve contained in these image files to recalculate the measured gray values and use them for display and quantification.
Other devices convert raw pixel values into real-world units (generally optical density or OD). This means that the range of gray values is the same no matter what the original image depth.
Melanie takes into account the conversion tables or calibration formulas stored in these files.
File format
Once an image has been acquired, it is converted to a particular file format for storage and image analysis. Most formats used for quantitative image analysis are based on the TIFF standard. In addition to the image data, the TIFF format includes a number of tags that describe certain properties of the file, such as gray levels, color table, byte format, image source, etc.
The input formats supported by Melanie are generally proprietary TIFF variants with a number of private tags:
- GEL (Molecular Dynamics)
- GSC, 1SC and SCN (Bio-Rad)
- IMG/INF (Fuji)
- MEL (Melanie/ImageMaster)
- TIF(F) (Tag Image File Format)
- TIF/TXT (16 bit float TIFF, LI-COR)
Note that the default TIF(F) format does not include calibration information, although some imaging tools do export .tif files that contain calibration tags.
Melanie does not support a number of other image file formats, notably those that use lossy compression methods (distorting the original pixel information) or are limited to 256 gray levels.
Image editing
Manipulation of images with general purpose graphics software not designed for quantitative image analysis may damage your files:
- Many common image processing applications ignore or even remove calibration information, and are not able to handle images with bit depths higher than 8 bit.
- You should not visually enhance your images by making any contrast, brightness, gamma, or other adjustments, because these will modify the quantitative data. You can use the Adjust contrast feature in Melanie to visually adjust the brightness and contrast in your images without changing the underlying pixel values.
- Similarly, you should avoid free rotation and scaling of images as much as possible. Flipping, mirroring, rotating by 90° steps and cropping are acceptable. But in any case, use Melanie or the software that came with your scanner to do these transformations.
DIGE file naming convention
To facilitate the import of DIGE images, it is recommended that the file names for the group of two or three images contain a common string and their respective dye names (Cy2, Cy3, Cy5).