Detection
The purpose of the spot detection step is to generate a unique spot pattern representative of all images in the experiment. This is done by first creating a fusion image of all images marked for inclusion. Spots are then detected on the fusion image using the default or possibly fine-tuned detection parameters. Finally, the spot pattern is propagated to all individual images so that the spots can be quantified.
How to
Set the detection parameters
You get an immediate preview of the spot pattern that will be applied when using the default detection parameters. You can fine-tune these parameters using the sliders or by typing a new value:
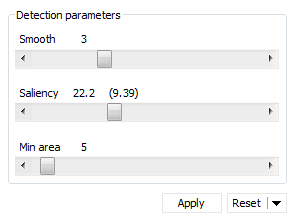
- Smooth: This parameter fixes the amount of smoothing before detecting spots. Optimize the Smooth parameter to detect all real spots and split as many overlapping spots as possible. Don’t be concerned about noise spots at this point. It is best to optimize the Smooth parameter first while having a very low Saliency value set.
- Saliency: This parameter based on the spot curvature indicates how far a spot stands out with respect to its environment. It can be considered as a spot quality measure. Real spots generally have high Saliency values whereas artifacts and background noise have small saliencies. Use the slider to discard all spots with saliencies smaller than the specified threshold.
- Min area: This parameter sets the minimal area below which a detected feature will not be considered as a spot. Use the Min area to get rid of speckles and dust particles that consist of a few very dark pixels and cannot be eliminated with the Saliency without suppressing real spots.
The values for the currently selected parameters can be found above each slider, and correspond to the red spot pattern. The previously applied spot detection parameters are mentioned between parentheses and relate to the gold-colored spots. They are only visible in 2D view when the current and previously applied detection parameters are different.
TIP
Use the Cursor information window to look up the Saliency of a spot that you consider should be removed. Set this value as the Saliency threshold.
NOTE
Spot Area and Min Area are not related. Therefore, you cannot use a spot’s Area value to set the Min Area threshold.
Select images for detection:
Click on the arrows next to Detection input to view and choose the images to be taken into account for the generation of a representative spot pattern. Only selected images will be considered in the spot detection, although the resulting spot pattern will be applied to all images.
Situations where you might want to exclude some images from the detection:
- When you have defects in your gels such as crackles, tears or other artifacts that could adversely affect the spot pattern.
- When you only want to include the pooled internal standard images for a DIGE experiment, to minimize nonsensical volume ratios. Indeed, spots present in an image but absent in the corresponding internal standard (where it will have a spot value close to zero) will be quantitatively doubtful.
- When your experiment includes images from different detection techniques, such as total protein stains and immuno-blots and you only want to use one of them to generate the spot pattern.
- When you want to avoid over- or under-representation of spot patterns from unbalanced experimental conditions. If your experimental conditions have very different numbers of images, you may exclude some of them so that each condition has the same number of images considered for detection.
To exclude/include an image for detection, click on the tick mark in front of its name. To exclude/include several images at the same time, hold the Ctrl or Shift keys to select several images, and then click the tick mark of a selected image.
Apply the detection parameters
The current detection parameters are automatically applied when you move on to the next workflow step. Click Apply to apply them immediately and continue fine-tuning the parameters.
When moving on to the next workflow step, Melanie will automatically quantify the spots on all images. Learn more about spot quantification.